
NEO builds smart economy and we at NEO SPCC help them with that big challenge. In our blog you might find the latest articles how we run NEOFS public test net but it’s not the only thing we’re working on.
NEO GO#
As you know network is composed of nodes. These nodes as of now have several implementations:
- https://github.com/neo-project/neo
- https://github.com/CityOfZion/neo-python
- https://github.com/nspcc-dev/neo-go
This article is about the last one since we’re developing it at NEO SPCC. Hope that this article will help you to get an idea of how everything is tied up and being able to start neo-go node, write smart contract and deploy it.
What is a node?#
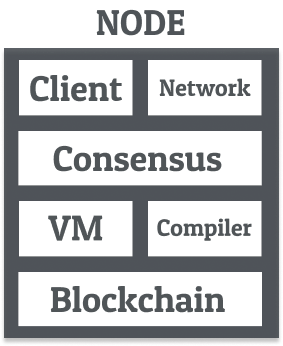
The main goal of the node is to interact with each other (through P2P) and synchronize blocks in the network. It also allows user to compile and run smart contracts within the blockchain network. Node consists of Client (CLI), Network layer, Consensus, Virtual Machine, Compiler and Blockchain. Let’s take a closer look at each of them.
Client#
Client (CLI) allows users to run commands from the terminal. These commands can be divided in 4 categories:
- server operations
- smart contract operations
- vm operations
- wallet operations
For example to connect node to the running private network you can use this command:
go run cli/main.go node -pHere you can find more information about Private Network and how to start it. Simply speaking private network -- it’s the network that you can run locally. Follow the link if you are interested in more detailed description medium article. Another usage example is to compile smart contract:
$ ./bin/neo-go vm
    _   ____________        __________      _    ____  ___   / | / / ____/ __ \      / ____/ __ \    | |  / /  |/  /  /  |/ / __/ / / / /_____/ / __/ / / /____| | / / /|_/ /  / /|  / /___/ /_/ /_____/ /_/ / /_/ /_____/ |/ / /  / /  /_/ |_/_____/\____/      \____/\____/      |___/_/  /_/

NEO-GO-VM > Once we run this command we will get an interface to interact with virtual machine.
To get a list of all supported operation you just use help:
NEO-GO-VM > help
Commands:  astack        Show alt stack contents  break         Place a breakpoint  clear         clear the screen  cont          Continue execution of the current loaded script  estack        Show evaluation stack contents  exit          Exit the VM prompt  help          display help  ip            Show current instruction  istack        Show invocation stack contents  loadavm       Load an avm script into the VM  loadgo        Compile and load a Go file into the VM  loadhex       Load a hex-encoded script string into the VM  ops           Dump opcodes of the current loaded program  run           Execute the current loaded script  step          Step (n) instruction in the program  stepinto      Stepinto instruction to take in the debugger  stepout       Stepout instruction to take in the debugger  stepover      Stepover instruction to take in the debugger
As you can see there are a lot of options to play with it. Let’s take simple smart contract 1-print.go and compile it:
package main
import (    "github.com/nspcc-dev/neo-go/pkg/interop/runtime")
func Main() { runtime.Log("Hello, world!")}Use command loadgo to compile it:
NEO-GO-VM > loadgo 1-print.goREADY: loaded 22 instructionsNEO-GO-VM 0 > And there you can see how many instructions were generated and even if you are interested in opcodes of current program you can dump them:
NEO-GO-VM 0 > ops0 PUSHDATA1 48656c6c6f2c20776f726c6421 ("Hello, world!") <<15 SYSCALL System.Runtime.Log (cfe74796)20 NOP21 RETLater we will use this compiled contract in a workshop =). You can find more information on how to use the CLI here
Network#
Network layer is one of the most important parts of the node. In our case we have P2P protocol which allows nodes to communicate with each other and RPC -- which is used for getting some information from node like balance, accounts, current state, etc. Here is the document where you can find supported RPC calls.
Consensus#
Consensus is a mechanism allowing nodes to agree on a specific value (block in case of blockchain). We use our own go-implementation of dBFT algorithm.
Compiler#
Compiler allows to build byte code, so you can write Smart Contract in your favourite Golang. All the output you saw in this example above was generated by the compiler.
Virtual machine#
Virtual machine runs compiled byte code. NeoVM is a stack-based virtual machine. It has 2 stacks for performing computation.
Blockchain#
And what is the Blockchain piece? It’s quite a big one since it contains operations with accepting/validation transactions, signing transactions, working with accounts, assets, storing blocks in database (or in cache).
Network#
There are 3 types of network. Private net -- it’s the private one which you can run locally. Testnet and Mainnet where much of the nodes across the world now running. NEO has a nice monitor where you can find particular node running in the blockchain network. Neo Monitor
Workshop. Preparation#
In this part we will setup the environment: run private network, connect neo-go node to it and transfer some initial GAS to our basic account in order to be able to pay for transaction deployment and invocation. Let's start.
Requirements#
For this workshop you will need Debian 10, Docker, docker-compose, go to be installed:
Versioning#
As with many other Neo projects NeoGo is currently on its way to Neo 3, so there are two main branches there — master, where all Neo 3 development is happening right now and master-2.x for stable Neo 2 implementation. This workshop contains basic tutorial notes for Neo 3 version. If you want to continue with Neo 2, please, refer to master-2.x branch.
Step 1#
If you already have neo-go or go smart-contracts, please, update go modules in order to be up-to-date with the current interop API changes. If not, download neo-go and build it (master branch):
$ git clone https://github.com/nspcc-dev/neo-go.git$ cd neo-go$ make build Step 2#
There are 2 ways of running local private network. One way is using neo-local private network and other way is with neo-go private network.
Running with neo-go private network#
$ make env_image$ make env_upResult: running privatenet:
=> Bootup environmentCreating network "neo_go_network" with the default driverCreating volume "docker_volume_chain" with local driverCreating neo_go_node_four ... doneCreating neo_go_node_two ... doneCreating neo_go_node_one ... doneCreating neo_go_node_three ... doneIn case you need to shutdown environment you can use:
$ make env_downRunning with neo local private network#
git clone https://github.com/CityOfZion/neo-local.git$ cd neo-local$ git checkout -b 4nodes 0.12$ make startStep 3#
Start neo-go node which will connect to previously started privatenet:
$ ./bin/neo-go node --privnetResult:
2020-12-17T14:51:53.200+0300    INFO    no storage version found! creating genesis block2020-12-17T14:51:53.203+0300    INFO    starting rpc-server {"endpoint": ":20331"}2020-12-17T14:51:53.203+0300    INFO    service is running  {"service": "Prometheus", "endpoint": ":2112"}2020-12-17T14:51:53.203+0300    INFO    service hasn't started since it's disabled  {"service": "Pprof"}2020-12-17T14:51:53.203+0300    INFO    node started    {"blockHeight": 0, "headerHeight": 0}
    _   ____________        __________   / | / / ____/ __ \      / ____/ __ \  /  |/ / __/ / / / /_____/ / __/ / / / / /|  / /___/ /_/ /_____/ /_/ / /_/ //_/ |_/_____/\____/      \____/\____/
/NEO-GO:0.91.1-pre-657-gc13d6ecc/
2020-12-17T14:51:53.204+0300 INFO new peer connected {"addr": "127.0.0.1:20333", "peerCount": 1}2020-12-17T14:51:53.206+0300 INFO started protocol {"addr": "127.0.0.1:20333", "userAgent": "/NEO-GO:0.91.1-pre-657-gc13d6ecc/", "startHeight": 0, "id": 3172166887}2020-12-17T14:51:54.204+0300 INFO blockchain persist completed {"persistedBlocks": 0, "persistedKeys": 71, "headerHeight": 0, "blockHeight": 0, "took": "765.955µs"}2020-12-17T14:51:56.204+0300 INFO new peer connected {"addr": "127.0.0.1:20336", "peerCount": 2}2020-12-17T14:51:56.204+0300 INFO new peer connected {"addr": "127.0.0.1:20334", "peerCount": 3}2020-12-17T14:51:56.205+0300 INFO new peer connected {"addr": "127.0.0.1:20335", "peerCount": 4}2020-12-17T14:51:56.205+0300 INFO new peer connected {"addr": "127.0.0.1:20333", "peerCount": 5}2020-12-17T14:51:56.205+0300 INFO started protocol {"addr": "127.0.0.1:20336", "userAgent": "/NEO-GO:0.91.1-pre-657-gc13d6ecc/", "startHeight": 0, "id": 90708676}2020-12-17T14:51:56.206+0300 WARN peer disconnected {"addr": "127.0.0.1:20333", "reason": "already connected", "peerCount": 4}2020-12-17T14:51:56.206+0300 INFO started protocol {"addr": "127.0.0.1:20334", "userAgent": "/NEO-GO:0.91.1-pre-657-gc13d6ecc/", "startHeight": 0, "id": 410946741}2020-12-17T14:51:56.207+0300 INFO started protocol {"addr": "127.0.0.1:20335", "userAgent": "/NEO-GO:0.91.1-pre-657-gc13d6ecc/", "startHeight": 0, "id": 4085957952}2020-12-17T14:52:35.213+0300 INFO blockchain persist completed {"persistedBlocks": 1, "persistedKeys": 19, "headerHeight": 1, "blockHeight": 1, "took": "518.786µs"}2020-12-17T14:52:50.217+0300 INFO blockchain persist completed {"persistedBlocks": 1, "persistedKeys": 19, "headerHeight": 2, "blockHeight": 2, "took": "384.966µs"}2020-12-17T14:53:05.222+0300 INFO blockchain persist completed {"persistedBlocks": 1, "persistedKeys": 19, "headerHeight": 3, "blockHeight": 3, "took": "496.654µs"}...Step 4#
Transfer some GAS from multisig account to our account.
Create NEP17 transfer transaction:
$ ./bin/neo-go wallet nep17 transfer -w .docker/wallets/wallet1.json --out my_tx.json -r http://localhost:20331 --from NVTiAjNgagDkTr5HTzDmQP9kPwPHN5BgVq --to NbrUYaZgyhSkNoRo9ugRyEMdUZxrhkNaWB --token GAS --amount 29999999Where
./bin/neo-goruns neo-gowallet nep17 transfer- command with arguments in neo-go-w .docker/wallets/wallet1.json- path to the wallet for the first node in the private network--out my_tx.json- output file for the signed transaction-r http://localhost:20331- RPC node endpoint--from NVTiAjNgagDkTr5HTzDmQP9kPwPHN5BgVq- multisig account to transfer GAS from--to NbrUYaZgyhSkNoRo9ugRyEMdUZxrhkNaWB- our account from the wallet--token GAS- transferred token name, which is GAS--amount 29999999- amount of GAS to transfer
Enter the password
one:Password >The result is transaction signed by the first node
my_tx.json.Sign the created transaction using the second node address:
$ ./bin/neo-go wallet sign -w .docker/wallets/wallet2.json --in my_tx.json --out my_tx2.json --address NVTiAjNgagDkTr5HTzDmQP9kPwPHN5BgVqWhere
-w .docker/wallets/wallet2.json- path to the wallet for the second node in private network--in my_tx.json- previously created transfer transaction--out my_tx2.json- output file for the signed transaction--address NVTiAjNgagDkTr5HTzDmQP9kPwPHN5BgVq- multisig account to sign the transaction
Enter the password
two:Enter password to unlock wallet and sign the transactionPassword >The result is transaction signed by both first and second nodes.
Sign the transaction using the third node address and push it to the chain:
$ ./bin/neo-go wallet sign -w ./.docker/wallets/wallet3.json --in my_tx2.json --out my_tx3.json --address NVTiAjNgagDkTr5HTzDmQP9kPwPHN5BgVq -r http://localhost:20331Enter the password
three:Enter password to unlock wallet and sign the transactionPassword >The result is transaction signed by the first, second and third nodes and deployed to the chain.
Check the balance:
Now you should have 29999999 GAS on the balance of
NbrUYaZgyhSkNoRo9ugRyEMdUZxrhkNaWBaccount. To check the transfer was successfully submitted usegetnep17transfersRPC call:curl -d '{ "jsonrpc": "2.0", "id": 1, "method": "getnep17transfers", "params": ["NbrUYaZgyhSkNoRo9ugRyEMdUZxrhkNaWB"] }' localhost:20331 | json_ppThe result should look like the following:
{ "result" : { "received" : [ { "blockindex" : 4, "assethash" : "0xd2a4cff31913016155e38e474a2c06d08be276cf", "transferaddress" : "NVTiAjNgagDkTr5HTzDmQP9kPwPHN5BgVq", "txhash" : "0x5c7ba46975bbcb3b7389373519cc9979d280208f8bf560f9661ae9942215404f", "timestamp" : 1621345458625, "transfernotifyindex" : 0, "amount" : "2999999900000000" } ], "sent" : [], "address" : "NbrUYaZgyhSkNoRo9ugRyEMdUZxrhkNaWB" }, "jsonrpc" : "2.0", "id" : 1}Workshop. Part 1#
Now you have all things done to write your first smart contract, deploy and invoke it. Let’s go!
Step 1#
Create basic "Hello World" smart contract (or use the one presented in this repo):
package main
import (    "github.com/nspcc-dev/neo-go/pkg/interop/runtime")
func Main() { runtime.Log("Hello, world!")}And save it as 1-print.go.
Create a configuration for it: https://github.com/nspcc-dev/neo-go-sc-wrkshp/blob/master/1-print.yml
Step 2#
Compile "Hello World" smart contract:
$ ./bin/neo-go contract compile -i 1-print.go -c 1-print.yml -m 1-print.manifest.jsonWhere
./bin/neo-goruns neo-gocontract compilecommand with arguments in neo-go-i 1-print.gopath to smart contract-c 1-print.ymlpath to configuration file-m 1-print.manifest.jsonpath to manifest file, which is required for smart contract deployment
Result:
Compiled smart-contract: 1-pring.nef and smart contract manifest 1-print.manifest.json
To dump all the opcodes, you can use:
$ ./bin/neo-go contract inspect -i 1-print.nefStep 3#
Deploy smart contract to the previously setup network:
$ ./bin/neo-go contract deploy -i 1-print.nef -manifest 1-print.manifest.json -r http://localhost:20331 -w my_wallet.jsonWhere
contract deployis a command for deployment-i 1-print.nefpath to smart contract-manifest 1-print.manifest.jsonsmart contract manifest file-r http://localhost:20331node endpoint-w my_wallet.jsonwallet to use to get the key for transaction signing (you can use one from the workshop repo)
Enter password qwerty for the account:
Enter account NbrUYaZgyhSkNoRo9ugRyEMdUZxrhkNaWB password >Result:
Contract: ecdd946811bcfe48feefb91c927234a6f18e341cb164f03a5dfc61273f7ebaf8943ff49a3ee1971babd25c7a817d46a2374f624aAt this point your ‘Hello World’ contract is deployed and could be invoked. Let’s do it as a final step.
Step 4#
Invoke contract.
$ ./bin/neo-go contract invokefunction -r http://localhost:20331 -w my_wallet.json ecdd946811bcfe48feefb91c927234a6f18e341c mainWhere
contract invokefunctionruns invoke with provided parameters-r http://localhost:20331defines RPC endpoint used for function call-w my_wallet.jsonis a walletecdd946811bcfe48feefb91c927234a6f18e341ccontract hash got as an output from the previous command (deployment in step 6)main- method to be called
Enter password qwerty for account:
Enter account NbrUYaZgyhSkNoRo9ugRyEMdUZxrhkNaWB password >Result:
Sent invocation transaction bfb0398f22ae15628a1353c3b84afba6ff994e48cd376b840825314abf9bc291In the console where you were running step #5 you will get:
2020-12-17T15:29:48.790+0300 INFO runtime log {"tx": "bfb0398f22ae15628a1353c3b84afba6ff994e48cd376b840825314abf9bc291", "script": "ecdd946811bcfe48feefb91c927234a6f18e341c", "msg": "Hello, world!"}Which means that this contract was executed.
This is it. There are only 4 steps to make deployment and they look easy, aren’t they? Thank you!
Workshop. Part 2#
In this part we'll look at RPC calls and try to write, deploy and invoke smart contract with storage. Let’s go!
RPC calls#
Let's check what's going on under the hood.
Each neo-go node provides an API interface for obtaining blockchain data from it.
The interface is provided via JSON-RPC, and the underlying protocol uses HTTP for communication.
Full NEO JSON-RPC 3.0 API described here.
RPC-server of started in step #3 neo-go node is available on localhost:20331, so let's try to perform several RPC calls.
GetRawTransaction#
GetRawTransaction returns the corresponding transaction information, based on the specified hash value.
Request information about our deployment transaction:
curl -d '{ "jsonrpc": "2.0", "id": 1, "method": "getrawtransaction", "params": ["b164f03a5dfc61273f7ebaf8943ff49a3ee1971babd25c7a817d46a2374f624a", 1] }' localhost:20331 | json_ppWhere
"jsonrpc": "2.0"is protocol version"id": 1is id of current request"method": "getrawtransaction"is requested method"params": ["b164f03a5dfc61273f7ebaf8943ff49a3ee1971babd25c7a817d46a2374f624a", 1]is an array of parameters, whereb164f03a5dfc61273f7ebaf8943ff49a3ee1971babd25c7a817d46a2374f624ais deployment transaction hash1isverboseparameter for detailed JSON string output
json_ppjust makes the JSON output prettier
Result:
{ "jsonrpc" : "2.0", "result" : { "confirmations" : 11, "netfee" : "1546520", "script" : "DQQBeyJuYW1lIjoiSGVsbG9Xb3JsZCBjb250cmFjdCIsImFiaSI6eyJtZXRob2RzIjpbeyJuYW1lIjoibWFpbiIsIm9mZnNldCI6MCwicGFyYW1ldGVycyI6W10sInJldHVybnR5cGUiOiJWb2lkIiwic2FmZSI6ZmFsc2V9XSwiZXZlbnRzIjpbXX0sImZlYXR1cmVzIjp7fSwiZ3JvdXBzIjpbXSwicGVybWlzc2lvbnMiOlt7ImNvbnRyYWN0IjoiKiIsIm1ldGhvZHMiOiIqIn1dLCJzdXBwb3J0ZWRzdGFuZGFyZHMiOltdLCJ0cnVzdHMiOltdLCJleHRyYSI6bnVsbH0MZE5FRjNuZW8tZ28tMC45NS4xLXByZQAAAAAAAAAAAAAAAAAAAAAAAAAAAAAAAAAAAAAAAAAAAAAAAAAAAAAAAAAAAAAAAAAAAAAWDA1IZWxsbywgd29ybGQhQc/nR5YhQLbNunASwB8MBmRlcGxveQwU/aP6Q0bqUyolj8SX3a3bZDfJ/f9BYn1bUg==", "sysfee" : "1001060650", "blocktime" : 1621345578680, "witnesses" : [ { "invocation" : "DECFNf91SCJf0Xj5MqwQY9lEFMKYiwkm/wHxvx8B/1gT0TkfH2eL8sSHM4b99QklcRAUgNfniPYacMtMaOCfrTlv", "verification" : "DCEDhEhWuuSSNuCc7nLsxQhI8nFlt+UfY3oP0/UkYmdH7G5BVuezJw==" } ], "attributes" : [], "vmstate" : "HALT", "hash" : "0xb164f03a5dfc61273f7ebaf8943ff49a3ee1971babd25c7a817d46a2374f624a", "nonce" : 1906296755, "validuntilblock" : 13, "blockhash" : "0x75e8dd246c40806b49502471d2d6244fcf8ae881216989119a3e32f0ddeb6959", "sender" : "NbrUYaZgyhSkNoRo9ugRyEMdUZxrhkNaWB", "signers" : [ { "scopes" : "None", "account" : "0x410b5658f92f9937ed7bdd4ba04c665d3bdbd8ae" } ], "size" : 563, "version" : 0 }, "id" : 1}GetApplicationLog#
GetApplicationLog returns the contract log based on the specified transaction id.
Request application log for invocation transaction from step #4:
curl -d '{ "jsonrpc": "2.0", "id": 1, "method": "getapplicationlog", "params": ["bfb0398f22ae15628a1353c3b84afba6ff994e48cd376b840825314abf9bc291"] }' localhost:20331 | json_ppWith a single parameter:
bfb0398f22ae15628a1353c3b84afba6ff994e48cd376b840825314abf9bc291- invocation transaction hash from step #7
Result:
{ "jsonrpc" : "2.0", "result" : { "executions" : [ { "trigger" : "Application", "notifications" : [], "gasconsumed" : "2028330", "stack" : [ { "type" : "Any" } ], "vmstate" : "HALT" } ], "txid" : "0xbfb0398f22ae15628a1353c3b84afba6ff994e48cd376b840825314abf9bc291" }, "id" : 1}Other Useful RPC calls#
curl -d '{ "jsonrpc": "2.0", "id": 5, "method": "getversion", "params": [] }' localhost:20331curl -d '{ "jsonrpc": "2.0", "id": 5, "method": "getblockcount", "params": [] }' localhost:20331curl -d '{ "jsonrpc": "2.0", "id": 5, "method": "getconnectioncount", "params": [] }' localhost:20331curl -d '{ "jsonrpc": "2.0", "id": 5, "method": "getcontractstate", "params": ["0xecdd946811bcfe48feefb91c927234a6f18e341c"] }' localhost:20331List of supported by neo-go node RPC commands you can find here.
Storage smart contract#
Let's take a look at the another smart contract example: 2-storage.go. This contract is quite simple and, as the previous one, doesn't take any arguments. On the other hand, it is able to count the number of its own invocations by storing an integer value and increment it after each invocation. We are interested in this contract as far as it's able to store values, i.e. it has a storage which can be shared within all contract invocations. We have to pay some GAS for storage usage, the amount depends on the storage operation (e.g. put) and data size.
This contract also has a special internal _deploy method which is executed when the contract is deployed or updated.
It should return no value and accept single bool argument which will be true on contract update.
Our _deploy method is aimed to initialise the storage value with 0 when the contract will be deployed.
Now, when we learned about the storage, let's try to deploy and invoke our contract!
Step #1#
Compile smart contract 2-storage.go:
$ ./bin/neo-go contract compile -i 2-storage.go -c 2-storage.yml -m 2-storage.manifest.jsonResult:
Compiled smart-contract: 2-storage.nef and smart contract manifest 2-storage.manifest.json
Step #2#
Deploy compiled smart contract:
$ ./bin/neo-go contract deploy -i 2-storage.nef -manifest 2-storage.manifest.json -r http://localhost:20331 -w my_wallet.json... enter the password qwerty:
Enter account NbrUYaZgyhSkNoRo9ugRyEMdUZxrhkNaWB password >Result:
Contract: 1b2fb1dc5b32934abae1ad1706b0e43513c44e661ea2a1ed6c2f651436e9fcf41023119f934cd0a4f38cac16ac9042c124345f0cWhich means that our contract was deployed and now we can invoke it.
Let's check that the storage value was initialised with 0. Use getapplicaionlog RPC-call for the deployment transaction:
curl -d '{ "jsonrpc": "2.0", "id": 1, "method": "getapplicationlog", "params": ["1ea2a1ed6c2f651436e9fcf41023119f934cd0a4f38cac16ac9042c124345f0c"] }' localhost:20331 | json_ppThe JSON result is:
{ "result" : { "txid" : "0x1ea2a1ed6c2f651436e9fcf41023119f934cd0a4f38cac16ac9042c124345f0c", "executions" : [ { "gasconsumed" : "1006244000", "notifications" : [ { "eventname" : "info", "state" : { "value" : [ { "type" : "ByteString", "value" : "U3RvcmFnZSBrZXkgbm90IHlldCBzZXQuIFNldHRpbmcgdG8gMA==" } ], "type" : "Array" }, "contract" : "0x1b2fb1dc5b32934abae1ad1706b0e43513c44e66" }, { "state" : { "type" : "Array", "value" : [ { "type" : "ByteString", "value" : "U3RvcmFnZSBrZXkgaXMgaW5pdGlhbGlzZWQ=" } ] }, "eventname" : "info", "contract" : "0x1b2fb1dc5b32934abae1ad1706b0e43513c44e66" }, { "contract" : "0xfffdc93764dbaddd97c48f252a53ea4643faa3fd", "state" : { "type" : "Array", "value" : [ { "type" : "ByteString", "value" : "Zk7EEzXksAYXreG6SpMyW9yxLxs=" } ] }, "eventname" : "Deploy" } ], "vmstate" : "HALT", "stack" : [ ... skipped serialized contract representation ... ], "trigger" : "Application" } ] }, "id" : 1, "jsonrpc" : "2.0"}Pay attention to the notifications JSON field: it contains two info notifications with base64-encoded messages.
To decode them just use echo string | base64 -d CLI command, e.g.:
$ echo U3RvcmFnZSBrZXkgbm90IHlldCBzZXQuIFNldHRpbmcgdG8gMA== | base64 -dwhich results in Storage key not yet set. Setting to 0 and
$ echo U3RvcmFnZSBrZXkgaXMgaW5pdGlhbGlzZWQ= | base64 -dwhich is Storage key is initialised.
Step #3#
Let's invoke our contract. As far as we have never invoked this contract, it should increment value from the storage (which is 0) and put the new 1 value back into the storage.
Let's check:
$ ./bin/neo-go contract invokefunction -r http://localhost:20331 -w my_wallet.json 1b2fb1dc5b32934abae1ad1706b0e43513c44e66 main... enter the password qwerty:
Enter account NbrUYaZgyhSkNoRo9ugRyEMdUZxrhkNaWB password >Result:
Sent invocation transaction ecc5aecf2334b06e0b5d76494bfdf3ddbaca675858f254aa4e4633756b86a40dTo check the counter value, call getapplicaionlog RPC-call for the invocation transaction:
curl -d '{ "jsonrpc": "2.0", "id": 1, "method": "getapplicationlog", "params": ["ecc5aecf2334b06e0b5d76494bfdf3ddbaca675858f254aa4e4633756b86a40d"] }' localhost:20331 | json_ppThe JSON result is:
{ "result" : { "txid" : "0xecc5aecf2334b06e0b5d76494bfdf3ddbaca675858f254aa4e4633756b86a40d", "executions" : [ { "notifications" : [ { "state" : { "type" : "Array", "value" : [ { "type" : "ByteString", "value" : "VmFsdWUgcmVhZCBmcm9tIHN0b3JhZ2U=" } ] }, "contract" : "0x1b2fb1dc5b32934abae1ad1706b0e43513c44e66", "eventname" : "info" }, { "state" : { "type" : "Array", "value" : [ { "type" : "ByteString", "value" : "U3RvcmFnZSBrZXkgYWxyZWFkeSBzZXQuIEluY3JlbWVudGluZyBieSAx" } ] }, "contract" : "0x1b2fb1dc5b32934abae1ad1706b0e43513c44e66", "eventname" : "info" }, { "contract" : "0x1b2fb1dc5b32934abae1ad1706b0e43513c44e66", "eventname" : "info", "state" : { "type" : "Array", "value" : [ { "type" : "ByteString", "value" : "TmV3IHZhbHVlIHdyaXR0ZW4gaW50byBzdG9yYWdl" } ] } } ], "stack" : [ { "type" : "Integer", "value" : "1" } ], "gasconsumed" : "7233580", "vmstate" : "HALT", "trigger" : "Application" } ] }, "id" : 1, "jsonrpc" : "2.0"}Pay attention to notifications field. It contains messages, which where passed to runtime.Notify method.
This one contains base64 byte arrays which can be decoded into 3 messages.
To decode them just use echo string | base64 -d CLI command, e.g.:
$ echo VmFsdWUgcmVhZCBmcm9tIHN0b3JhZ2U= | base64 -dwhich results in:
Value read from storageSo, these 3 messages are:
Value read from storagewhich was called after we've got the counter value from storageStorage key already set. Incrementing by 1which was called when we realised that counter value is 0New value written into storagewhich was called after the counter value was put in the storage.
The final part is stack field. This field contains all returned by the contract values, so here you can see integer value 1,
which is the counter value denoted to the number of contract invocations.
Step #4#
To ensure that all works as expected, let's invoke the contract one more time and check, whether the counter will be incremented:
$ ./bin/neo-go contract invokefunction -r http://localhost:20331 -w my_wallet.json 1b2fb1dc5b32934abae1ad1706b0e43513c44e66 main... enter the password qwerty:
Enter account NbrUYaZgyhSkNoRo9ugRyEMdUZxrhkNaWB password >Result:
Sent invocation transaction 593a7c887d9d216adb46b322be05b3a0ba4d6be8450f478e3d71c6304189328cTo check the counter value, call getapplicaionlog RPC-call for the invocation transaction:
curl -d '{ "jsonrpc": "2.0", "id": 1, "method": "getapplicationlog", "params": ["593a7c887d9d216adb46b322be05b3a0ba4d6be8450f478e3d71c6304189328c"] }' localhost:20331 | json_ppThe JSON result is:
{ "jsonrpc" : "2.0", "id" : 1, "result" : { "executions" : [ { "vmstate" : "HALT", "stack" : [ { "value" : "2", "type" : "Integer" } ], "notifications" : [ { "contract" : "0x1b2fb1dc5b32934abae1ad1706b0e43513c44e66", "state" : { "type" : "Array", "value" : [ { "type" : "ByteString", "value" : "VmFsdWUgcmVhZCBmcm9tIHN0b3JhZ2U=" } ] }, "eventname" : "info" }, { "eventname" : "info", "state" : { "value" : [ { "value" : "U3RvcmFnZSBrZXkgYWxyZWFkeSBzZXQuIEluY3JlbWVudGluZyBieSAx", "type" : "ByteString" } ], "type" : "Array" }, "contract" : "0x1b2fb1dc5b32934abae1ad1706b0e43513c44e66" }, { "state" : { "value" : [ { "value" : "TmV3IHZhbHVlIHdyaXR0ZW4gaW50byBzdG9yYWdl", "type" : "ByteString" } ], "type" : "Array" }, "contract" : "0x1b2fb1dc5b32934abae1ad1706b0e43513c44e66", "eventname" : "info" } ], "gasconsumed" : "7233580", "trigger" : "Application" } ], "txid" : "0x593a7c887d9d216adb46b322be05b3a0ba4d6be8450f478e3d71c6304189328c" }}The stack field contains now 2 integer value, so the counter was incremented as we expected.
Workshop. Part 3#
In this part we'll know about NEP5 token standard and try to write, deploy and invoke more complicated smart contract. Let’s go!
NEP17#
NEP17 is a token standard for the Neo blockchain that provides systems with a generalized interaction mechanism for tokenized smart contracts. The example with implementation of all required by the standard methods you can find in nep17.go
Let's take a view on the example of smart contract with NEP17: token.go
This smart contract initialises nep17 token interface and takes operation string as a parameter, which is one of:
symbolreturns ticker symbol of the tokendecimalsreturns amount of decimals for the tokentotalSupplyreturns total token * multiplierbalanceOfreturns the token balance of a specific address and requires additional argument:accountwhich is requested address
transfertransfers token from one user to another and requires additional arguments:fromis account which you'd like to transfer tokens fromtois account which you'd like to transfer tokens toamountis the amount of token to transferdatais any additional parameter which shall be passed toonNEP17Paymentmethod (if the receiver is a contract) Let's perform several operations with our contract.
Step #1#
To compile token.go you can use configuration.
Compile smart contract:
$ ./bin/neo-go contract compile -i examples/token/token.go -c examples/token/token.yml -m examples/token/token.manifest.jsonDeploy smart contract:
$ ./bin/neo-go contract deploy -i examples/token/token.nef -manifest examples/token/token.manifest.json -r http://localhost:20331 -w my_wallet.json... enter the password qwerty:
Enter account NbrUYaZgyhSkNoRo9ugRyEMdUZxrhkNaWB password >Result:
Contract: 13175d9c27074057cf4d8c50183ce9d4dceaf95ce0d85465a2fcfbb5280f068dc22979259d59d0f4d9a871a6de96fc0b92eaa3a5
Which means that our contract was deployed and now we can invoke it.
Step #2#
Let's invoke the contract to perform different operations.
To start with, query Symbol of the created nep17 token:
$ ./bin/neo-go contract invokefunction -r http://localhost:20331 -w my_wallet.json 13175d9c27074057cf4d8c50183ce9d4dceaf95c symbolWhere
13175d9c27074057cf4d8c50183ce9d4dceaf95cis our contract hash from step #1symbolis operation string which was described earlier and returns token symbol
... and don't forget the password of your account qwerty.
Result:
Sent invocation transaction bd85005d02c383c400595fcefb237a9f0a0919d16f7e0dbe72336c592f1951b6Now, let's take a detailed look at this invocation transaction with getapplicationlog RPC call:
curl -d '{ "jsonrpc": "2.0", "id": 1, "method": "getapplicationlog", "params": ["bd85005d02c383c400595fcefb237a9f0a0919d16f7e0dbe72336c592f1951b6"] }' localhost:20331 | json_ppResult:
{ "result" : { "executions" : [ { "notifications" : [], "vmstate" : "HALT", "trigger" : "Application", "stack" : [ { "value" : "QU5U", "type" : "ByteString" } ], "gasconsumed" : "4294290" } ], "txid" : "0xbd85005d02c383c400595fcefb237a9f0a0919d16f7e0dbe72336c592f1951b6" }, "jsonrpc" : "2.0", "id" : 1}At least, you can see that stack field of JSON result is not empty: it contains base64 byte array with the symbol of our token.
Following commands able you to get some additional information about token:
$ ./bin/neo-go contract invokefunction -r http://localhost:20331 -w my_wallet.json 13175d9c27074057cf4d8c50183ce9d4dceaf95c decimals$ ./bin/neo-go contract invokefunction -r http://localhost:20331 -w my_wallet.json 13175d9c27074057cf4d8c50183ce9d4dceaf95c totalSupplyStep #3#
Now it's time for more interesting things. First of all, let's check the balance of nep17 token on our account by using balanceOf:
$ ./bin/neo-go contract invokefunction -r http://localhost:20331 -w my_wallet.json 13175d9c27074057cf4d8c50183ce9d4dceaf95c balanceOf NbrUYaZgyhSkNoRo9ugRyEMdUZxrhkNaWB... with qwerty password. The result is:
Sent invocation transaction 84e819e08a05a0709aa5cfc02e613b7aaa4650f324cd37eda4e2941605354498And take a closer look at the transaction's details with getapplicationlog RPC-call:
curl -d '{ "jsonrpc": "2.0", "id": 1, "method": "getapplicationlog", "params": ["84e819e08a05a0709aa5cfc02e613b7aaa4650f324cd37eda4e2941605354498"] }' localhost:20331 | json_ppResult:
{ "result" : { "executions" : [ { "stack" : [ { "value" : "0", "type" : "Integer" } ], "notifications" : [], "trigger" : "Application", "vmstate" : "HALT", "gasconsumed" : "5311140" } ], "txid" : "0x84e819e08a05a0709aa5cfc02e613b7aaa4650f324cd37eda4e2941605354498" }, "jsonrpc" : "2.0", "id" : 1}As far as stack field contains integer value 0, we have no token on the balance. But don't worry about that. Just follow the next step.
Step #4#
Before we are able to start using our token (e.g. transfer it to someone else), we have to mint it.
In other words, we should transfer all available amount of token (total supply) to someone's account.
There's a special function for this purpose in our contract - Mint function. However, this function
uses CheckWitness runtime syscall to check whether the caller of the contract is the owner and authorized
to manage initial supply of tokens. That's the purpose of transaction's signers: checking given hash
against the values provided in the list of signers. To pass this check we should add our account to
transaction's signers list with CalledByEntry scope. So let's mint token to our address:
$ ./bin/neo-go contract invokefunction -r http://localhost:20331 -w my_wallet.json 13175d9c27074057cf4d8c50183ce9d4dceaf95c mint NbrUYaZgyhSkNoRo9ugRyEMdUZxrhkNaWB -- NbrUYaZgyhSkNoRo9ugRyEMdUZxrhkNaWB:CalledByEntryWhere:
--is a special delimiter of transaction's cosigners listNbrUYaZgyhSkNoRo9ugRyEMdUZxrhkNaWBis the signer itself (which is our account)
... with qwerty pass. The result:
Sent invocation transaction 17ceda88c215876c45e2e824cd62639c113f2be235278649024124d8f0213da3getapplicationlog RPC-call for this transaction tells us the following:
{ "result" : { "txid" : "0x17ceda88c215876c45e2e824cd62639c113f2be235278649024124d8f0213da3", "executions" : [ { "trigger" : "Application", "gasconsumed" : "16522950", "vmstate" : "HALT", "notifications" : [ { "contract" : "0x13175d9c27074057cf4d8c50183ce9d4dceaf95c", "state" : { "type" : "Array", "value" : [ { "type" : "Any" }, { "value" : "rtjbO11mTKBL3XvtN5kv+VhWC0E=", "type" : "ByteString" }, { "value" : "1100000000000000", "type" : "Integer" } ] }, "eventname" : "Transfer" } ], "stack" : [ { "value" : true, "type" : "Boolean" } ] } ] }, "id" : 1, "jsonrpc" : "2.0"}Here we have true at the stack field, which means that token was successfully minted.
Let's just ensure that by querying balanceOf one more time:
$ ./bin/neo-go contract invokefunction -r http://localhost:20331 -w my_wallet.json 13175d9c27074057cf4d8c50183ce9d4dceaf95c balanceOf NbrUYaZgyhSkNoRo9ugRyEMdUZxrhkNaWB... with qwerty pass. The result:
Sent invocation transaction 95fed6e224071b09e885994aa869bee9b3dd815e89cc11b871b4432a35d04b0a... with the following getapplicationlog JSON message:
{ "result" : { "executions" : [ { "stack" : [ { "value" : "1100000000000000", "type" : "Integer" } ], "trigger" : "Application", "vmstate" : "HALT", "gasconsumed" : "5557020", "notifications" : [] } ], "txid" : "0x95fed6e224071b09e885994aa869bee9b3dd815e89cc11b871b4432a35d04b0a" }, "jsonrpc" : "2.0", "id" : 1}Now we can see integer value at the stack field, so 1100000000000000 is the nep17 token balance of our account.
Note, that token can be minted only once.
Step #5#
After we are done with minting, it's possible to transfer token to someone else.
Let's transfer 5 tokens from our account to NgzuJWWGVEwFGsRrgzj8knswEYRJrTe7sm with transfer call:
$ ./bin/neo-go contract invokefunction -r http://localhost:20331 -w my_wallet.json 13175d9c27074057cf4d8c50183ce9d4dceaf95c transfer NbrUYaZgyhSkNoRo9ugRyEMdUZxrhkNaWB NgzuJWWGVEwFGsRrgzj8knswEYRJrTe7sm 500000000 null -- NbrUYaZgyhSkNoRo9ugRyEMdUZxrhkNaWB:CalledByEntry... with password qwerty and following result:
Sent invocation transaction 5b8c23f4816b67e67e869c4305942fb81041671e70bed6a3888e7493883db8bdOur favourite getapplicationlog RPC-call tells us:
{ "result" : { "executions" : [ { "vmstate" : "HALT", "notifications" : [ { "contract" : "0x13175d9c27074057cf4d8c50183ce9d4dceaf95c", "state" : { "type" : "Array", "value" : [ { "type" : "ByteString", "value" : "rtjbO11mTKBL3XvtN5kv+VhWC0E=" }, { "type" : "ByteString", "value" : "50l6vFaauRKm8hPVkr3Aw2CeHQs=" }, { "type" : "Integer", "value" : "500000000" } ] }, "eventname" : "Transfer" } ], "trigger" : "Application", "gasconsumed" : "14760950", "stack" : [ { "type" : "Boolean", "value" : true } ] } ], "txid" : "0x5b8c23f4816b67e67e869c4305942fb81041671e70bed6a3888e7493883db8bd" }, "jsonrpc" : "2.0", "id" : 1}Note, that stack field contains true, which means that token was successfully transferred.
Let's now check the balance of NgzuJWWGVEwFGsRrgzj8knswEYRJrTe7sm account to ensure that the amount of token on that account = 5:
$ ./bin/neo-go contract invokefunction -r http://localhost:20331 -w my_wallet.json 13175d9c27074057cf4d8c50183ce9d4dceaf95c balanceOf NgzuJWWGVEwFGsRrgzj8knswEYRJrTe7smThe getapplicationlog RPC-call for this transaction tells us the following:
{ "id" : 1, "jsonrpc" : "2.0", "result" : { "executions" : [ { "trigger" : "Application", "stack" : [ { "value" : "500000000", "type" : "Integer" } ], "gasconsumed" : "5557020", "notifications" : [], "vmstate" : "HALT" } ], "txid" : "0x022ade3087cb32fed650b1ab6a799ac9861539308a27f54ba6f38ffde26bd424" }}Here we are! There are exactly 5 tokens at the stack field. You can also ensure that these 5 tokens were debited from NbrUYaZgyhSkNoRo9ugRyEMdUZxrhkNaWB account by using balanceOf method.
Workshop. Part 4#
In this part we'll summarise our knowledge about smart contracts by investigating 4-domain smart contract. This contract contains code for domain registration, transferring, deletion and getting information about registered domains.
Let’s go!
Step #1#
Let's take a glance at our contract and inspect it. The contract takes an action string as the first parameter, which is one of the following:
registerchecks, whether domain with the specified name already exists. If not, it also adds the pair[domainName, owner]to the storage. It requires additional arguments:domainNamewhich is the new domain name.owner- the 34-digit account address from our wallet, which will be used for contract invocation.
queryreturns the specified domain owner address (or false, if no such domain was registered). It requires the following argument:domainNamewhich is requested domain name.
transfertransfers domain with the specified name to the other address (of course, in case if you're the actual owner of the domain requested). It requires additional arguments:domainNamewhich is the name of domain you'd like to transfer.toAddress- the account address you'd like to transfer the specified domain to.
deletedeletes the specified domain from the storage. The arguments:domainNamewhich is the name of the domain you'd like to delete.
In the next steps we'll compile and deploy smart contract. After that we'll try to register new domain, transfer it to another account and query information about it.
Step #2#
Compile smart contract 4-domain.go with configuration
$ ./bin/neo-go contract compile -i 4-domain.go -c 4-domain.yml -m 4-domain.manifest.json... and deploy it:
$ ./bin/neo-go contract deploy -i 4-domain.nef --manifest 4-domain.manifest.json -r http://localhost:20331 -w my_wallet.jsonJust a note: our contract uses storage and, as the previous one, needs the flag hasstorage to be set to true value.
That can be done in configuration file.
... enter the password qwerty:
Enter account NbrUYaZgyhSkNoRo9ugRyEMdUZxrhkNaWB password >Result:
Contract: 5e6d360e472798ee10c676022761bc5a2c3828f5a84ea858045b498b73319d8acdf0f95c9bdba4227b0999006176c0136306b80fYou know, what it means :)
Step #3#
Invoke the contract to register domain with name my_first_domain:
$ ./bin/neo-go contract invokefunction -r http://localhost:20331 -w my_wallet.json 5e6d360e472798ee10c676022761bc5a2c3828f5 register my_first_domain NbrUYaZgyhSkNoRo9ugRyEMdUZxrhkNaWB -- NbrUYaZgyhSkNoRo9ugRyEMdUZxrhkNaWB:CalledByEntry... the strongest password in the world, guess: qwerty
Enter account NbrUYaZgyhSkNoRo9ugRyEMdUZxrhkNaWB password >Result:
Sent invocation transaction a7f868e07898592de9846549b4395190dfe7efbbdd521178c2b72d96c25dd831Also you can see the log message in the console, where you run neo-go node:
2020-12-17T17:31:43.480+0300 INFO runtime log {"tx": "a7f868e07898592de9846549b4395190dfe7efbbdd521178c2b72d96c25dd831", "script": "5e6d360e472798ee10c676022761bc5a2c3828f5", "msg": "RegisterDomain: my_first_domain"}Well, that's ok. Let's check now, whether our domain was registered with getapplicationlog RPC-call:
curl -d '{ "jsonrpc": "2.0", "id": 1, "method": "getapplicationlog", "params": ["a7f868e07898592de9846549b4395190dfe7efbbdd521178c2b72d96c25dd831"] }' localhost:20331 | json_ppThe result is:
{ "jsonrpc" : "2.0", "result" : { "txid" : "0xa7f868e07898592de9846549b4395190dfe7efbbdd521178c2b72d96c25dd831", "executions" : [ { "stack" : [ { "type" : "Boolean", "value" : true } ], "gasconsumed" : "9143210", "trigger" : "Application", "notifications" : [ { "contract" : "0x5e6d360e472798ee10c676022761bc5a2c3828f5", "eventname" : "registered", "state" : { "type" : "Array", "value" : [ { "value" : "rtjbO11mTKBL3XvtN5kv+VhWC0E=", "type" : "ByteString" }, { "type" : "ByteString", "value" : "bXlfZmlyc3RfZG9tYWlu" } ] } } ], "vmstate" : "HALT" } ] }, "id" : 1}Especially, we're interested in two fields of the json:
First one is notifications field, which contains one notification with registered name:
bXlfZmlyc3RfZG9tYWlubyte string in base64 representation, which can be decoded tomy_first_domain- our domain's nameecv/0NH0e0cStm0wWBgjCxMyaok=byte array, which can be decoded to the account addressNbrUYaZgyhSkNoRo9ugRyEMdUZxrhkNaWB.
The second field is stack with true value, which was returned by the smart contract.
All of these values let us be sure that our domain was successfully registered.
Step #4#
Invoke the contract to query the address information our my_first_domain domain:
$ ./bin/neo-go contract invokefunction -r http://localhost:20331 -w my_wallet.json 5e6d360e472798ee10c676022761bc5a2c3828f5 query my_first_domain... the pass qwerty:
Enter account NbrUYaZgyhSkNoRo9ugRyEMdUZxrhkNaWB password >Result:
Sent invocation transaction b8b1e8e473437badfad13355c65da6bcd1e868bd30fbedfcd8f9fd5daef52bfband log-message:
2020-12-17T17:39:32.677+0300 INFO runtime log {"tx": "7693ddedee55e1ccf2914a049d3cf5c3d1b29d5fb8ecbd3e9bd5672a242170a6", "script": "5e6d360e472798ee10c676022761bc5a2c3828f5", "msg": "QueryDomain: my_first_domain"}Let's check this transaction with getapplicationlog RPC call:
curl -d '{ "jsonrpc": "2.0", "id": 1, "method": "getapplicationlog", "params": ["b8b1e8e473437badfad13355c65da6bcd1e868bd30fbedfcd8f9fd5daef52bfb"] }' localhost:20331 | json_pp... which gives us the following result:
{ "jsonrpc" : "2.0", "id" : 1, "result" : { "txid" : "0xb8b1e8e473437badfad13355c65da6bcd1e868bd30fbedfcd8f9fd5daef52bfb", "executions" : [ { "vmstate" : "HALT", "stack" : [ { "type" : "ByteString", "value" : "rtjbO11mTKBL3XvtN5kv+VhWC0E=" } ], "gasconsumed" : "4321230", "trigger" : "Application", "notifications" : [] } ] }}with base64 interpretation of our account address NbrUYaZgyhSkNoRo9ugRyEMdUZxrhkNaWB on the stack, which means that domain my_first_domain was registered by the owner with received account address.
Step #5#
Invoke the contract to transfer domain to the other account (e.g. account with NgzuJWWGVEwFGsRrgzj8knswEYRJrTe7sm address):
$ ./bin/neo-go contract invokefunction -r http://localhost:20331 -w my_wallet.json 5e6d360e472798ee10c676022761bc5a2c3828f5 transfer my_first_domain NgzuJWWGVEwFGsRrgzj8knswEYRJrTe7sm -- NbrUYaZgyhSkNoRo9ugRyEMdUZxrhkNaWB... the password: qwerty
Enter account NbrUYaZgyhSkNoRo9ugRyEMdUZxrhkNaWB password >Result:
Sent invocation transaction c1a97f8263cfea75ea27b31b53a4a2088d4a0f48d03c9967f92aa96fbf74a603and log-message:
2020-12-17T17:44:07.536+0300 INFO runtime log {"tx": "5d06117399a2ffc35d1f4a16fc16de7ab5136406b16dbfb8cda033d31cb59bcc", "script": "5e6d360e472798ee10c676022761bc5a2c3828f5", "msg": "TransferDomain: my_first_domain"}Perfect. And getapplicationlog RPC-call...
curl -d '{ "jsonrpc": "2.0", "id": 1, "method": "getapplicationlog", "params": ["c1a97f8263cfea75ea27b31b53a4a2088d4a0f48d03c9967f92aa96fbf74a603"] }' localhost:20331 | json_pp... tells us:
{ "id" : 1, "jsonrpc" : "2.0", "result" : { "executions" : [ { "stack" : [ { "value" : true, "type" : "Boolean" } ], "gasconsumed" : "7680110", "vmstate" : "HALT", "trigger" : "Application", "notifications" : [ { "eventname" : "deleted", "state" : { "value" : [ { "type" : "ByteString", "value" : "rtjbO11mTKBL3XvtN5kv+VhWC0E=" }, { "type" : "ByteString", "value" : "bXlfZmlyc3RfZG9tYWlu" } ], "type" : "Array" }, "contract" : "0x5e6d360e472798ee10c676022761bc5a2c3828f5" }, { "state" : { "value" : [ { "value" : "50l6vFaauRKm8hPVkr3Aw2CeHQs=", "type" : "ByteString" }, { "type" : "ByteString", "value" : "bXlfZmlyc3RfZG9tYWlu" } ], "type" : "Array" }, "contract" : "0x5e6d360e472798ee10c676022761bc5a2c3828f5", "eventname" : "registered" } ] } ], "txid" : "0xc1a97f8263cfea75ea27b31b53a4a2088d4a0f48d03c9967f92aa96fbf74a603" }}The notifications field contains two events:
- First one with name
deletedand additional information (domainmy_first_domainwas deleted from accountNbrUYaZgyhSkNoRo9ugRyEMdUZxrhkNaWB), - Second one with name
registeredand additional information (domainmy_first_domainwas registered with accountNgzuJWWGVEwFGsRrgzj8knswEYRJrTe7sm). Thestackfield containstruevalue, which means that our domain was successfully transferred.
Step #6#
The last call is delete, so you can try to create the other domain, e.g. my_second_domain and then remove it from storage with:
$ ./bin/neo-go contract invokefunction -r http://localhost:20331 -w my_wallet.json 5e6d360e472798ee10c676022761bc5a2c3828f5 register my_second_domain NbrUYaZgyhSkNoRo9ugRyEMdUZxrhkNaWB -- NbrUYaZgyhSkNoRo9ugRyEMdUZxrhkNaWB:CalledByEntry$ ./bin/neo-go contract invokefunction -r http://localhost:20331 -w my_wallet.json 5e6d360e472798ee10c676022761bc5a2c3828f5 delete my_second_domain -- NbrUYaZgyhSkNoRo9ugRyEMdUZxrhkNaWBThank you!